
Appearance
Extrude
Pushing a closed profile perpendicular to its sketch plane. This is the only way solids come into existence.
Press E, or the Extrude… button in the Timeline, and the command dialog opens over the drawing. The sketch stays live under it: clicking a closed region picks it.
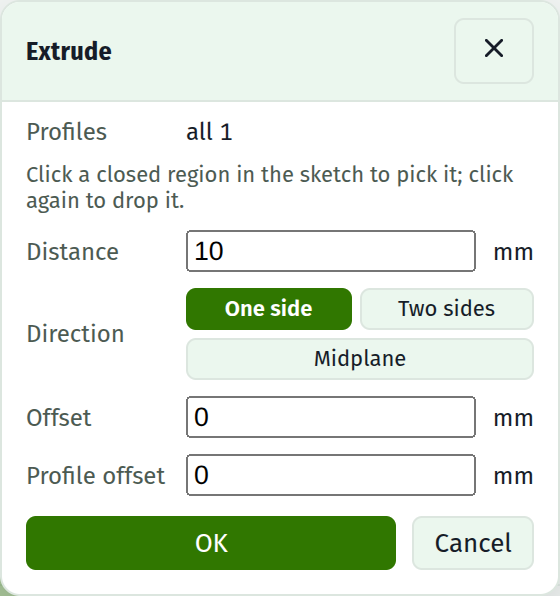
Fields
| Field | Notes |
|---|---|
| Profiles | Which closed regions sweep. All of them by default; click a region in the sketch to narrow the pick, click again to drop it, All to reset |
| Distance | Millimetres. Accepts arithmetic and parameter names. Negative goes the other way along the plane normal |
| Direction | One side sweeps off the plane. Two sides adds a second distance running the other way. Midplane straddles the plane, half each way |
| Second side | Only for Two sides: how far the sweep also runs the other way |
| Offset | Start the sweep this far off the sketch plane. Negative starts behind it |
| Profile offset | Grow the shape being swept this far all round before it sweeps; negative shrinks it. See offset |
| Operation | Join, Cut, Intersect, or New body. Shown for a sketch that sits on a face; a base sketch always adds |
| OK | Commits the feature |
When OK is disabled
The dialog needs at least one closed profile, and at least one picked. Otherwise you get Close a profile to extrude., and the profile row in the status foot says whether the problem is an open chain or branching geometry.
A sweep with no length is refused.
Picking profiles
By default the extrude takes every closed region in the sketch, the way it always has: a profile nested inside another becomes a hole rather than a second solid. Draw a rectangle and a circle inside it, extrude once, and you get a plate with a hole through it.
With the dialog open, clicking a region picks just it; more clicks add and remove regions, and the picked ones shade stronger. Two profiles that need different depths are two extrudes of the same sketch: pick one, extrude, then pick the other.
The pick holds the regions themselves, so editing the sketch afterwards keeps it aimed. A pick whose regions have been deleted fails the build with a message rather than quietly sweeping everything.
See profiles.
The operations
Join unions the new material into the solid. Cut subtracts it. Intersect keeps only what the new material and the solid share.
These are offered on a sketch that sits on a face. That is not arbitrary: a cut is placed by the face it was drawn on, and a base sketch on the world plane has no established relationship to the existing material.
New body builds the feature into a solid of its own instead of folding it into the part it was sketched on. The new body appears in the Bodies list, can be moved and jointed like any other, and a combine can boolean it against the rest whenever you choose. This is how a lid is made on the box it fits.
To carve into a part, pick a face, press Sketch on face, draw the pocket outline, and extrude as a Cut. See pocket and cut.
Direction and offset
Normally an extrude starts at the sketch plane and goes one way. Two sides runs a second distance the other way, each side with its own number. Midplane starts half the distance behind the plane and ends half in front, so the plane sits in the middle; useful when the sketch plane is a symmetry plane of the part.
Midplane is ignored for cuts. A cut is positioned by the face it is drawn on; straddling that face would carve air on one side. A two-sided cut is allowed, and its second side is how far the cut also reaches out of the face.
Offset slides the whole sweep along the plane normal before it runs, so a boss can start above the face it was sketched on, or a pocket below it.
Profile offset
The other offset, and a different axis entirely: it grows or shrinks the SHAPE being swept rather than moving the sweep along. Set it to 0.2 and the boss is 0.2 fatter all round; set it to -2 on a cut and the pocket is inset 2 from the outline drawn, which is how a box gets hollowed out.
Nothing in the sketch moves for it. The sketch keeps saying what the part is and the feature says how much room to leave around it, so a clearance is one number that can be changed on its own or driven from a parameter.
Growing rounds the corners it opens, shrinking leaves them sharp, and an offset deep enough to consume the shape is refused rather than guessed at. See offset for all of it, and for the sketch command that draws an offset as geometry instead.
Changing it later
The Timeline row carries a live distance field. Change it and the solid rebuilds through every later feature. Changing a plate from 10 mm to 15 mm keeps every boss, pocket and blend on it.
For everything else the row carries a gear: it re-opens the dialog on the feature, with its profiles picked and its numbers in the fields. Direction, offset, profile offset and operation are all editable there. New body is the one creation-only choice, since re-homing a built feature would renumber the bodies under everything that names them.
After it lands
Creating an extrude switches you to the model view automatically. The Timeline gains an Extrude row, and the volume and triangle count appear below.
From then on every sketch change rebuilds the solid: editing a dimension, dragging a point, undoing. There is no manual rebuild and no way to defer it.
Ordering
Features rebuild in Timeline order, which is creation order. There is no way to reorder them. The rollback marker sets how much of that order is built, so a feature can be edited with everything after it out of the way.
Blends are the exception. They always apply after every extrude, wherever their row appears, because an edge does not exist until both the faces meeting at it do.